How To Apply Eyeshadow

Want the perfect eye makeup? Here are 6 steps to blending eyeshadow like a pro, plus our guide to your MUST-HAVE eye makeup brushes!
We know that creating a smokey eye or trying to blend eyeshadow is never easy, and sometimes it can be overwhelming with the amount of brushes to choose from. So, we’ve listed below your must-have eye makeup brushes and a guide to what they're best used for!
What's the difference between our essential eye makeup brushes!?
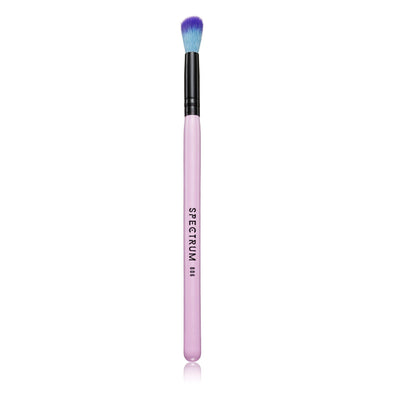
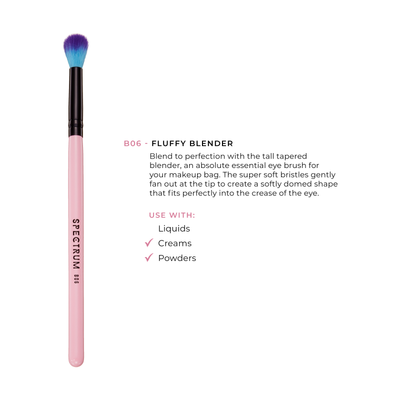
B06 - Super fluffy and rounded. Great for applying your first eyeshadow base colour! Also a multi-use brush for buffing out concealer under the eye.
B07 - Tapered fluffy brush. The bristles taper to a point which helps apply eyeshadow directly to the crease, whilst the shorter outer bristles blend the edges.
B11 - Detailed fluffy brush which is like a baby version of the B07. Keeps the eyeshadow super precise. Also great if you don’t have a lot of eyelid space as it doesn’t apply eyeshadow too high above the crease and really focuses the colour in that area!
A28 - Firm, flat and great for packing on eyeshadow on the outer corner or helps intensify shimmer shades as it really holds the eyeshadow in the firm bristles.
How to create the perfect eyeshadow blend!
Step 1 - PREP & PRIME
First things first, your eyeshadow will only look as good as your base! Not prepping your eyes can make your eyeshadow fade throughout the day.
Ensure you use some sort of concealer or eye primer to create an even blank canvas and to hide any eye veins or blemishes across the eye lid.
Next, use a translucent powder to set this in place and ensure the base isn’t tacky! This will make blending so much easier and smoother.
Step 2 - TRANSITION
You can never have too many blending brushes, and your tools really are your best friend to get the job done!
For a beginner, we recommend starting off with 2 blending brushes, so it’s not too overwhelming. We’d suggest…
B06 - Our ride or die blending brush! A MUST-HAVE in anyone's makeup bag.

B11 - Which is more of a precise blending brush. It's not too firm, so still helps blend the eyeshadow, but keeps it a little more precise! Larger blending brushes can cause the eyeshadow to look messy and sometimes you end up blending too high above the crease! You can also use the same brush on the lower lash line as it's super small and helps diffuse eyeshadow across this area.

When it comes to eye makeup, we have a rule of thumb that makes blending so much easier:
Always start with your ‘transition colour’. This will always be a few shades darker than your natural skin tone. For example, if you’re going for a brown smokey eye, try applying a light toned brown as your first colour.
Applying a lighter transition colour will help your darker colour blend a lot easier and help you create that gradient, smooth blend from light to dark. (darkest in the crease, lighter towards the brow bone).
For example, as a beginner, applying a dark eyeshadow straight to the skin can be super harsh and make blending so much harder!
Start from the outer corner of your eye, applying the transition colour through the natural crease of your eye. You’ll feel this right under the natural brow bone. Use your brush in ‘windshield wiper motions’ - back and fourth through the natural crease of the eye. Following your natural eye shape can help guide your brush in the correct direction, so let the brush do the work!

The B06 is the perfect size to disperse the eyeshadow evenly across the crease and slightly above the crease too.
TIP: If you’ve got hooded eyes - Whilst your eyes are open, apply the eyeshadow slightly higher than your natural crease. This way, you can see exactly where your eyeshadow will be when your eyes are looking forward. As otherwise, if you apply this to your crease and your lid, then open your eye - you’ll cover all your amazing eyeshadow work!
If you want to stop here and create a super natural look, you can use your bronzer or blusher as eye makeup to tie your whole look together. Using a B06, just follow your natural eye crease and this will create soft definition without looking too obvious. It’s always great when your products are multi-purpose!
Step 3 - ADD DEPTH
Next, to create more depth through the crease - choose a colour slightly darker than your transition shade to create more of a gradient effect.
Using a smaller detailing blending brush like the B11, makes applying darker colours a little less daunting! As its small and fluffy, it works well with applying the eyeshadow to a specific area, but ensures it’s not too harsh.
Apply the darker colour on the outer crease, but this time don’t take it in as far. Start by wiggling your brush on the outer corner in circular motions. Once you’ve got the colour laid down in the outer corner of the eye, start by blending it a little further into the crease to about halfway across, again in small circular motions. Then, repeat the first motion as before, back and forth in windshield wiper motions.

Wherever you apply your brush first, is typically where the darkest point of the eyeshadow will be as this is where most of the product is applied. This is why you initially want to place the brush on the outer corner of the eye.
TIP: Hold your brush at roughly a 90-degree angle to your face. This will help apply the eyeshadow exactly where you put it. Otherwise, holding the brush parallel to your face can cause the eyeshadow to blend too high.
When blending the eyeshadow across the crease, always try to use the tip of the bristles, as this is where it’s most fluffy!
Whereas, if you want to pack on the eyeshadow a little more and create more depth, you can use the side of the brush with the darker colour and using patting motions, dab the brush up and down on the outer corner of the eye. This will really lay down the colour and will keep the eyeshadow exactly where you put it, ensuring you keep the intensity of the eyeshadow.
Use the top lash line and the crease as a guide and try to keep the eyeshadow in this area, creating a sideways 'V' on the outer corner and lightly through the crease.
Always go back in with your first brush (B06) and blend over the work you’ve just done to ensure there's no harsh lines and to further merge the two eyeshadows together.
STEP 4 - SMOKE IT OUT (Optional)
Using the same B11 brush, this is where you can decide whether you want to add a darker shade and to create more of a smokey look.
With darker shades, we always recommend applying the eyeshadow lower than where you actually want it. For example, dark eyeshadows, like black, will typically travel further, the more you blend it out, so you have to be careful when applying your darkest shade!
TIP: Your brush is similar to a pen or a paint brush. The closer your hand is to the bristles, the heavier the pressure! Which essentially applies more product. Whereas, the higher you hold your brush, the lighter the pressure, making application gentler. It’s always easier to add than to take away!
STEP 5 - DEFINE
We prefer a brush that is a little firmer and enables you to pack on the colour, whilst still being super precise for adding definition.
In the same area as before, dab your darker colour up and down with your A29 brush which is flatter (If you're feeling confident, go for black or stick to a dark brown if you don't want anything too harsh).
Apply this across the outer corner of the top lash line, ensuring it's thicker on the outer edge and gradually getting thinner the closer you get to the mid part of the eye. This step is also great for prepping the eyes before liner to create that smokey liner look!

Remember, flatter brushes are firmer and more compact, so you would use this kind of brush when you want the eyeshadow to be super intense and more opaque.
You’ll normally need to finish off with your smaller blending brush to ensure the edges aren’t too harsh.
TIP: If you find your eyeshadow isn't blending as smooth as you want, use a translucent powder or a skin coloured powder with a B06 and buff it on the edges of your eyeshadow. This will soften the blend and smooth it out!
This flat A29 brush is also great for applying eyeshadow across the lower lash line. Applying your medium tone eyeshadow here can balance out the whole look and ensure your top lash line doesn’t look too ‘top heavy’. This also creates definition and shapes the eye.
We would recommend taking this to about halfway across the lower lash line, to really lift the eyes. Hold a hand-held mirror above your eyes, to help make it a little easier to apply to this area. Simply, use the tip of the flat brush and run the eyeshadow across the lower lash line in side to side motions.
You can add the darker colour on the very outer quarter of the lower lash line to define even more for the ultimate smokey look!
STEP 6 - CLEAN UP
If you make any mistakes, have no fear! Here are a few tips on how to correct them.
1. Before you apply your eyeshadow, pop some translucent powder under the eye, from the nose to just past the edge of the eye in a 'C' shape. This will catch any eyeshadow fallout. When you've finished up your eye makeup, sweep the powder away! Spray some setting spray over the face and this will settle down the powder if you don't like wearing too much under the eye.
2. Use your concealer or foundation with a flat but fluffy brush like our A08 and using your lower lash line as a guide, lightly swipe the tip of the brush back and forth in the same angle as your eye. This will clean up any unnecessary eyeshadow and make the whole eyeshadow look neater.
3. Another step is actually doing your eye makeup before your foundation! This way if you get any eyeshadow fall down, you can simply use some micellar water and a cotton pad (make sure you're eco-friendly and use a reusable/washable one!). Fold it in half and with the same technique as above swipe in the same direction. Easy peasy! There's no right or wrong way, see which technique you prefer!
4. If you find your eyeshadow isn't blending as smooth as you want, use a translucent powder or a skin coloured powder with a B06 and buff it on the edges of your eyeshadow. This will soften the blend and smooth it out!
Here is the finished look!

What's the first step to applying eyeshadow like a pro? Having the perfect brush. Shop our beginner brush sets, then take a look at our dreamy blendable eyeshadow palettes and toppers to complete your look.
For more tips, check out our YouTube tutorial on how to blend eyeshadow!